Feeds:
Posts
Comments

Wrap Top

Wrap top

Over the weekend I was looking for a quick project that I could post about, and ran across this free pattern by Megan Nielsen that I had bookmarked a few weeks ago.  I had some purple jersey fabric left over from another project, just enough to whip it up!

How I wish I had made this top months ago!  I love that it doesn’t matter how much bigger my belly grows, it will keep fitting!  That also means that it fits my rule for maternity clothes: I want to be able to wear it both before and after the baby is born with minimal altering.  It seems like such a waste to spend time making a top that, at this point, I could only wear for another 8 weeks!  Pardon me while I go and freak out for a minute…

As the date for baby’s arrival gets closer and closer, I am finding myself nesting more and more.  I spent the better part of the last two weekends cleaning, purging, and organizing.  It has helped that it is finally starting to feel like spring around here, and I can partially blame my frenzy on the “Spring Cleaning” bug.  Hmm, maybe this is how I freak out?

wrap top, profile

Crepes with Strawberry Preserves

Yes, I know what you may be thinking…”Strawberry season?  I thought that was in the summer…?”  You are right, strawberry season is in the summer around here.  However, when a friend of mine got an ad in the mail for our local grocery store, strawberries were listed at $0.97 a pound!!  She discovered that this year Florida’s strawberry season has been very late, and is coinciding with California’s strawberry season…good news for us canners!! 

Ideally, I would have loved to have gotten these strawberries more locally, maybe even from my farmer’s market, but the lure of the deal I would be getting got the best of me.  At least the strawberries are from this country. 

I used the recipe for Strawberry Jam by Food In Jars to process my strawberries.  I loved the idea of using vanilla beans and lemon zest for a warmer, more interesting flavor.  Additionally, many other recipes that I saw used much more sugar, sometimes twice as much.  I like my preserves to taste more like the fruit itself then like candy.

Preserving for the first time this year showed me how much I had already learned in canning, as well as how much I have yet to learn.  I know the process well, sterilize, cook, fill, process, cool.  But I have so much more to learn about the art of canning.  It takes so much intuition and experience.  My jam turned out delicious, but a bit on the loose side.  I know that as I can more and more fruits and vegetables, I will be able to tell when a recipe is not going exactly as planned, and hopefully will know how to fix the problem.

Not all was lost for this “jam”, however.  Last night I threw together one of the tastiest desserts I have had in a long time…crepes with strawberry syrup and powdered sugar!

CrepesAdapted from the Better Homes and Gardens Cookbook

  • 2 eggs
  • 1 cup flour
  • 1 cup milk
  • 2 tablespoons of melted butter (plus more for oiling the pan)
  • dash of salt
  • dash of vanilla or a bit of vanilla bean
  1. Mix flour and eggs as well as you can.  Slowly add 1 cup of milk, whisking to eliminate lumps of flour.  Add butter, salt, and vanilla.  Whisk to combine.
  2. With a medium skillet over medium-high heat, melt a small bit of butter to coat.  Pour 1/4-1/3 cup of crepe batter, and tilt the pan to coat the bottom.  Cook until golden, then flip.  When the second side is done, spread a small bit of butter over the crepe.  Fold or roll crepe and place on plate.  Repeat with remainder of batter.
  3. Lightly dust the crepes with powdered sugar, and drizzle with warm strawberry syrup (or your favorite topping).  Eat all of them!!

It was so great to start the season with a big canning adventure!  How do you feel about canning with food bought from the grocery store vs. local food?

Bubble Chandelier

Bubble Chandelier

As soon as I saw this DIY Chandelier by Rachel of Small Notebook, I fell in love.  I have had a single, naked lightbulb providing light to our living room since we moved in 9 months ago.  So sad looking.  This is the project I had been looking for to revamp our lighting.

Rachel’s original chandelier had a lot more glass balls, and two extra lights on it, but I only had one light, so  I decided to make a simpler version, like the one she made for her kids’ room.  Instead of floral wire, I used picture hanging wire…not white, but it still worked well.

New Stash

Anna Maria Horner, Good Folks Fabric

Hello Everyone, I hope all of you who celebrate the holiday had a happy Easter!  A little package finally arrived in the mail the other day…a little spring to brighten my week!  This is my new Anna Maria Horner Good Folks stash.

Settling on bedding for my little one has been one of the hardest decisions for me so far (yes I know, compared to all the questions about how to be a good parent/how to raise a child, this might seem like a very small dilemma…).  You know that I finally chose colors for the baby’s room, and I thought these fabrics went perfectly!  My plan is to sew a fairly simple quilt, that is bordered in little triangles of this colorful fabric.  Something like this:

Baby Quilt Plan

I love the little triangles, and I am going to echo that design by making triangle fabric flags out of the scraps to hang around her room.

Originally, I was planning on using the fabric that I designed to make bedding for my little one, but I was really getting stuck on the color and trying to make the pattern “just right”.  I decided that instead of stressing about it, I would use fabric that I already know I love, and use my fabric design as an art print for the wall.  Luckily, my fabric has little triangle flags on the hot air balloons, which I think will tie in perfectly with everything else in the decor.

Anna Maria Horner stash

Boys Kimono PJ’s

Kimono Pj's detail

After my mixed experience with the “Easy” Empire Waist top pattern by Amy Butler, I was a bit wary of trying any more of her patterns.  I kept looking through the book, though, and could not resist giving one more pattern a try.  I made a promise to myself before I began that I would trust my instincts, and if the instructions did not seem right, I would do what I thought I should do instead of blindly following.

I am so happy that I tried out this pattern for the Kimono PJ’s.  It was much easier to follow, and I only had to rip out one seam (my fault, not hers)!!  What is even better, is I was able to complete this project in one day.  It was very exciting!

I chose a rich, soft, brown linen for the main fabric for these pj’s.  I wanted to use a natural, breathable material that could be worn in multiple seasons, since I have no idea how big my friend’s baby is going to be, or when he will fit into this outfit.  The trim is an Echino cotton double gauze (mine is the blue, not the purple, but I could not find the exact fabric I used online).  I have used other prints in the double gauze and I just love how soft it is!  Perfect for lying against a small baby’s skin.

I loved sewing this pattern so much, that I am already planning on what fabrics to use for a set for my little one.

Kimono Pj's

Wooden Turtle Teething Ring

About a month ago, I wrote about Mike’s new woodworking hobby.  Well, he finally got the saw he had been eyeing and made his first project…a colaboration between the two of us.  And I have to say, this is probably the best first project that I have ever seen!  He did such a great job, smoothing the edges to make it safe for baby mouth contact, and shaping the whole thing perfectly.

So what is it?  Its a teething ring!  Made out of untreated oak and finished with walnut oil.

Turtle Teething Ring

  • 5″ square 1/4 inch untreated wood
  • walnut oil
  • turtle teething ring pattern
  • scroll saw (if you don’t have one, you may be able to borrow or rent one)
  • drill
  • sandpaper in medium, fine, and superfine
  • tacky cloth
  • old towel
  1. Cut out pattern and trace with a pencil onto wood.
  2. Using your saw, cut around the turtle.  Take your time!  And use safety precautions (ie. goggles, gloves, etc.)
  3. To cut the middle out, drill a hole in the center.  Unplug your saw, insert the blade into the whole and attach the blade properly to your saw, and plug it back in. 
  4. Cut around the circle.  Unplug saw, remove blade and toy.
  5. Starting with the coarsest sandpaper, sand the toy fixing any small mistakes, and rounding all the edges.  Work your way to the superfine sandpaper, making sure the whole toy is smooth.  Keep an eye out for rough or pointy edges, and smooth them down.
  6. Use the tacky cloth to remove all the fine dust covering the toy.
  7. Take the towel and dip in some walnut oil.  Smooth oil evenly over the surface of the toy.  Wait 20 minutes, then repeat.  Repeat applying oil until the turtle is well oiled (it may need more coats as it gets used by your little one).

Belated Pi Day

Pi day Pie

Having a Math Nerd for a husband (and many Math Nerds as friends) means that there are little things my family may do differently than your average family.  Take for example Pi Day (3/14)…a whole day devoted to a number…or for me, a whole day of eating pie!

making the pie

I was really happy to finally use up the cherries that I canned over the summer.  I didn’t have enough of either sour or sweet cherries for a full pie, so I decided to  put them together to make one Super-Cherry Pie.  It made for interesting flavors.  I also, of course, made the vent in the shape of the Pi symbol, on Mike’s request.  It may be my very favorite part of the pie!

Slice of Cherry Pie

My friend Stephanie made a very delicious strawberry pie, which was beautiful, and tasted even better than it looked…I went back for seconds!

Stephanie's Strawberry Pie

Stephanie's Strawberry pie, detail

The second pie that I made (which of course I didn’t take pictures of….sorry!!) was a chicken/tomato/parmesan hand pie.  I know you can’t see what it looked like, but it was delicious!

Chicken Parmesan Hand Pies

  • 2 chicken breasts, rinsed and patted dry
  • 1 large can crushed tomatoes
  • 1 small onion, diced
  • 1 garlic clove, minced
  • 1/2 teaspoon dried oregano
  • pinch of nutmeg
  • pinch of red pepper flakes
  • 1 tablespoon olive oil
  • salt and pepper to taste
  • 2 batches of Pate Brisee (omit the sugar)
  • 1/4-1/2 cup finely grated parmesan cheese
  • 1 1/2 cups grated mozzarella
  • ice water
  1. Heat a medium pan over medium-high heat.  Drizzle olive oil in the bottom of the pan.  Saute garlic and onions until the onions are transluscent.  Add tomatoes, oregano, nutmeg, and red pepper flakes, bring to a boil.
  2. Place chicken breasts in sauce and cover pan with a lid.  Adjust heat to bring sauce to a simmer.  Simmer the chicken breasts in sauce until they are fully cooked.  Turn the chicken once or twice while cooking to coat in sauce.
  3. Remove chicken from pan and allow to cool on a plate.  Cool the sauce as well.  Cut chicken in thin strips against the grain of the meat.
  4. Roll the dough out to 1/8″ thickness and cut into 4″ circles (work in batches if needed).  Place the circles of dough in the frige for 30 minutes.
  5. Place dough circles on baking sheets.  Fill each piece of dough with a couple strips of chicken, a tablespoon or two of sauce and a sprinkling of mozzarella and parmesan. 
  6. Dab ice water around the edges of the circles, fold one half of the circle over to the other side, and pinch closed with a fork or your fingers.  Make a small slit in the top or stab it a couple of times with a fork.  Refrigerate hand pies for another 30 minutes.
  7. Pre-heat the oven to 375 degrees F.  Place pies in the oven for about 15-20 minutes, or until golden (May take more or less time depending on your oven.  Go by the color, not the time!).
  8. Remove from oven and allow to cool slightly before enjoying!

 Have you ever celebrated Pi Day?  or Pie Day??

Wipes

Mike and I have made the decision to only use cloth diapers and cloth wipes with out baby.  The initial cost of using these two things is the one con that I see to using them.  To help with that, I decided to make the wipes.

I found this blue flannel fabric at the LA Garment District for about $2.  And no, I’m not talking per yard here…it was $2 for about 2.25 yards of fabric!  That is my kind of deal!  In my opinion, I don’t really care what color the flannel is, or how it looks because it will  be used primarily to wipe up poo.  So blue?  Not a problem for me at all.

I made the wipes using these instructions for two layer, turned and top-stitched wipes, and nothing could be easier, or quicker to put together. In one hour, I was able to finishe 4 wipes, and cut out 20 more (and the cutting took the majority of the time).  To moisten the wipes we will try a few combinations from some wipe solution recipes that I found online.

For those of you will kids, do you have any idea how many wipes I might need to start out with?

Bronson Lace

Bronson Lace

Bronson Lace is another block weaving pattern, like summer and winter.  Because of this, it is an easy design to visualize.  When I picked out the colors for this piece, I must have still been thinking of the colors for the baby’s room, because I came home with yellow, purple and pink (though I decided to nix the yellow later).

This is the pattern I designed:

Bronson Lace Block design

You can easily see the pattern in the finished piece:

Bronson Lace Detail

One thing I didn’t realize when designing this is the lace can be seen easier if there is more than one block together.  With the way I did it, the actual lace is a bit hard to see because the blocks just kind of collapse on themselves.  If I had put blocks next to each other, you would see more spaces.  Luckily I still really like how this piece looks, and I plan on making a longer one to use as a sash/headband.  Maybe I will even reconsider using the yellow…

Weaving Detail

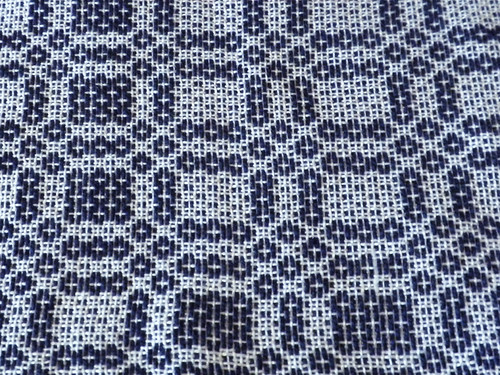
Another week means another weaving project for me.  Actually, I have another one on the way, because I’m a little behind on my homework!  This time around we were given a Summer and Winter project.  This type of weave is called Summer and Winter because the finished fabric is opposite on each side…one side is light, and one side is dark.  My teacher told us that this first became popular in America when families did not have enough money to buy two bed covers for the warm season and cold season.  They would buy/weave bed coverings in the Summer and Winter pattern and use one side for the warm months, and the other for the cold months.  Traditionally, white yarn is used for the background, and a dark color like navy is used for the foreground.  Since this was my first time attempting this type of weave, I decided to go with the classic look.

Another characteristic of the Summer and Winter weave is it is usually a fairly firm weave, making it great for towels, handbags, and bed coverings, but not so good for clothing and scarves (unless you use teeny tiny threads).  I opted for a set of hand towels because they are small and easy.  I used 100% cotton thread for optimal water absorbancy.

What I loved about Summer and Winter is it is really easy to design a pattern.  Basically, with my loom, I can make two different pattern blocks, A and B, and put them together in an almost unlimited number of combinations to make a pattern. 

Up next?  Lace!

Summer and Winter Hand Towel